ラベル KVM (Kernel-based Virtual Machine) の投稿を表示しています。 すべての投稿を表示

2012年11月25日日曜日

KVM (Kernel-based Virtual Machine) の migration を行う際に、開ける必要のあるファイアウォールのポート番号

一番初めに答えから言いますと、KVM (Kernel-based Virtual Machine) の migration を行う際に、開ける必要のあるファイアウォールのポート番号は、「49152-49215」です。

この投稿では、CentOS 6.3 (x86_64) + GNOME (GUI) にて、ファイアウォールのポートを開ける手順を説明します。

GNOME (GUI) ではなく、iptables を CUI で手作業で設定されている方は、「49125-49215」を空けるように CUI で手作業設定を変更して下さい。(この投稿では、主に GUI の設定手順を説明します。CUI の設定手順はこの文章の補足をご参照ください)

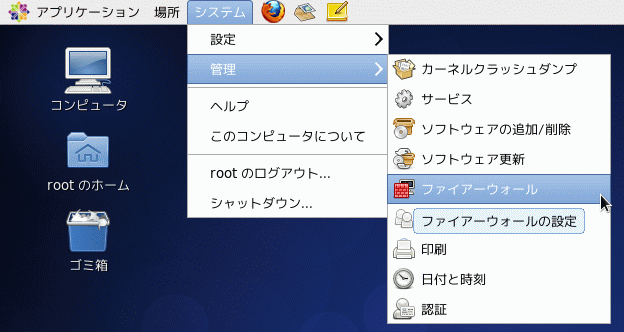
  1. GNOME でファイアウォール設定画面を起動します。

    「(GNOME の) システム」→「設定」→「ファイアウォール」

    図1.「ファイアウォール設定(GUI) を起動する」

  2. GNOME でファイアウォール設定画面の起動時に、警告メッセージが表示されます。

    「CUI で手作業でファイアウォール (iptables) の設定をしている場合は、この GUI のファイアウォールの設定画面は使わずに、手作業で設定を行なって下さい。」という意味です。
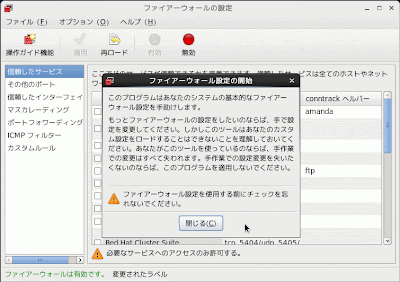
    図2.「ファイアウォール設定(GUI)画面起動時の警告メッセージ」

    ここでは、「閉じる」を押します。

  3. 左側で「その他のポート」をクリックします。右側にポートが「49152-49215」でプロトコルが「TCP」の行が存在するどうかを探します。

    以下の画面の例ではすでに存在しているので、「49152-49215」の「TCP」のポートはすでに開かれている状態です。これ以下の作業は不要です。

    図3.「ファイアウォール設定(GUI)画面」

  4. 左側で「その他のポート」をクリックします。右側にポートが「49152-49215」でプロトコルが「TCP」の行が存在しない場合は、ポートが「49152-49215」でプロトコルが「TCP」の行を追加する必要があります。
    1. 「追加」ボタン (※ 図3を参照) をクリックします。
    2. 「ユーザー定義」のチェックボックスをオンにします (※ 図4を参照)。
    3. 「ポート」の欄には「49152-49215」と入力します (※ 図4を参照)。
    4. 「プロトコル」は「TCP」を選択します (※ 図4を参照)。

    図4.ファイアウォールの空きポート追加の画面

    「OK (※ 図4を参照)」→「適用 (※ 図3を参照)」→「(警告画面の) はい」の順番にクリックします。
補足 その1 「/etc/sysconfig/iptables」を直接手動で編集する場合

手作業で修正を行う場合は、「vi /etc/sysconfig/iptables」などで iptables のファイルを開き、

-A INPUT -m state --state NEW -m tcp -p tcp --dport 49152:49215 -j ACCEPT

という行を追加します。以下、追加した例です。

# Firewall configuration written by system-config-firewall
# Manual customization of this file is not recommended.
*filter
:INPUT ACCEPT [0:0]
:FORWARD ACCEPT [0:0]
:OUTPUT ACCEPT [0:0]
-A INPUT -m state --state ESTABLISHED,RELATED -j ACCEPT
-A INPUT -p icmp -j ACCEPT
-A INPUT -i lo -j ACCEPT
-A INPUT -m state --state NEW -m tcp -p tcp --dport 22 -j ACCEPT
-A INPUT -m state --state NEW -m tcp -p tcp --dport 49152:49215 -j ACCEPT
-A INPUT -j REJECT --reject-with icmp-host-prohibited
-A FORWARD -j REJECT --reject-with icmp-host-prohibited
COMMIT

追加し終えたら、保存して vi を終了します。

iptables ファイルに加えた変更を有効にするために、iptables サービスを一旦停止して、再起動します。

[root@pc111 ~]# service iptables stop
iptables: ファイアウォールルールを消去中: [ OK ]
iptables: チェインをポリシー ACCEPT へ設定中filter [ OK ]
iptables: モジュールを取り外し中: [ OK ]
[root@pc111 ~]# service iptables start
iptables: ファイアウォールルールを適用中: [ OK ]
iptables: 追加のモジュールを読み込み中:nf_conntrack_netbios[ OK ]
[root@pc111 ~]#

以上で、手動で iptables ファイルを編集する方法は終了です。

参考

2012年11月11日日曜日

KVM (Kernel-based Virtual Machine) のゲストOS (guest OS) を、仮想マシンマネージャーでマイグレーションを実行すると「No such file or directory」のエラーが発生する場合の対処

質問

KVM (Kernel-based Virtual Machine) のゲストOS (guest OS) を、仮想マシンマネージャーでマイグレーションを実行すると「No such file or directory」のエラーが発生する場合があります。その場合の対処はどのようになっていますか?

回答

このファイルは、仮想ハードディスクのファイルです。

dd コマンドにて、そのファイルをダミーで作成します (= 内容は全く無関係のファイルを作成)。

ここでは、pc111(ホストOS)上の「pc162」というゲストOS(仮想マシン) を、pc121(ホストOS) にマイグレーションする場合を例に説明します。

具体的には、「pc111というホストOS上の、『pc162』というゲストOSの仮想ハードディスクファイルの『pc162.img』を、pc121というホストOSに作成する」場合を例に説明します。

  1. 「コピー『元』ホストOSのマシン」にて、コピー元のオリジナルの仮想ハードディスクファイルのファイルサイズを確認します。

    KVM (Kernel-based Virtual Machine) の仮想ハードディスクファイルはデフォルトでは、「/var/lib/libvirt/images/」ディレクトリ内に存在します。

    [root@pc111 ~]# cd /var/lib/libvirt/images

    「ls -al」を実行して、ファイルサイズを確認します。ここでは例として「pc162.img」のファイルサイズを確認します。

    [root@pc111 images]# ls -al
    合計 608174148
    drwx--x--x. 2 root root 4096 8月 24 03:31 2012 .
    drwxr-xr-x. 9 root root 4096 9月 19 07:07 2012 ..
    -rwxr-xr-x. 1 qemu qemu 128849018880 11月 11 21:21 2012 pc154.img
    -rwxr-xr-x. 1 qemu qemu 128849018880 11月 11 21:19 2012 pc155.img
    -rwxr-xr-x. 1 qemu qemu 128849018880 11月 11 21:21 2012 pc156.img
    -rwxr-xr-x. 1 qemu qemu 128849018880 11月 11 21:20 2012 pc157.img
    -rw-------. 1 qemu qemu 42949672960 11月 11 21:21 2012 pc162.img
    -rw-------. 1 root root 42949672960 9月 6 14:11 2012 pc163.img
    -rw-r--r--. 1 root root 21474836480 9月 6 23:17 2012 pc171.img
    [root@pc111 images]#

    「pc162.img」のファイルサイズは「42949672960」バイトです。これは「40」GB と同じ意味です。

  2. 「コピー『先』ホストOSのマシン」にて、dd コマンドを利用して、ダミーのファイルを作成します。「/var/lib/libvirt/images/pc162.img」というファイルを、40GB のファイルサイズで作成する場合の例は以下の通りです。

    まずは、「/var/lib/libvirt/images/pc162.img」というファイルが既に存在しているかを確認します。

    [root@pc121 ~]# cd /var/lib/libvirt/images
    [root@pc121 images]# ls
    [root@pc121 images]#

    ls コマンドを実行しても、「pc162.img」というファイルは表示されませんでした。

    次に、dd コマンドで「pc162.img」というファイルを作成します。

    [root@pc121 images]# dd if=/dev/zero of=/var/lib/libvirt/images/pc162.img bs=1G count=40

    上のとおりに入力して「Enter」キーを押すと、dd コマンドが実行されます。時間がかかるので待ちます。

  3. dd コマンドの実行が終了した時の画面表示の例です。

    以下の画面では 40GB ではなく、43GB と表示されていますが、正しく 40GB のファイルが作成されているので心配する必要はありません。

    [root@pc121 images]# dd if=/dev/zero of=/var/lib/libvirt/images/pc162.img bs=1G count=40
    40+0 records in
    40+0 records out
    42949672960 bytes (43 GB) copied, 444.256 s, 96.7 MB/s
    [root@pc121 images]#
  4. これで、仮想マシンマネージャーで「オフラインでマイグレーション」を実行すると、(時間はかかりますが) マイグレーションが実行できるようになります。

KVM(Kernel-based Virtual Machine) のゲストOS (guest OS) を仮想マシンマネージャーで起動する手順

1.はじめに

KVM(Kernel-based Virtual Machine) のゲストOS (guest OS) を仮想マシンマネージャーで起動する手順をここでは説明します。

手順の説明の際に利用した環境は以下のとおりです。

ホスト OS (host OS)CentOS 6.3 (x86_64)
ホスト OS (host OS) の hostnamepc111
ホスト OS (host OS) の X-Window の種類GNOME
ゲスト OS (guest OS)Windows 7 Professional (64bit)
ゲスト OS (guest OS) の hostnamepc157

このブログの投稿では、「pc111」上で、仮想マシンの「pc157」を起動する場合を例に説明します。

2.準備

以下の手順を実行する前に、あらかじめ、pc111 の CentOS を起動してログインをしておきます。

3.実際の手順

  1. CentOS にログイン済みの状態で、仮想マシンマネージャーを起動します。

    「アプリケーション」→「システムツール」→「仮想マシンマネージャ」

  2. 以下は、仮想マシンマネージャーが起動した直後の画面です。
  3. ここでは例として、「pc157」という仮想マシン (ゲストOS、guest OS) を起動します。

    「pc157」を右クリックして、「実行」を左クリックします。

  4. 「pc157」という仮想マシン (ゲストOS、guest OS) の電源がオンになりました。

    仮想マシンマネージャーの画面上は「pc157」は「停止中」から「実行中」に表示が変わっています。

  5. 「pc157」という仮想マシン (ゲストOS、guest OS) の画面を表示したい場合は、「pc157」を右クリックして「開く」を左クリックします。
  6. 「pc157」という仮想マシン (ゲストOS、guest OS) の画面が表示されます。以下はその表示例です。

    「pc157」起動中の画面(その1)

  7. 「pc157」起動中の画面(その2)です。
  8. 「pc157」起動中の画面(その3)です。

2012年6月25日月曜日

Linux CentOS 6.2 (x86_64) にて、KVM (Kernel-based Virtual Machine) の xml ファイルと仮想imgファイルをバックアップするスクリプト

1.「kvm-bkonevm.sh」スクリプト概要

Linux CentOS 6.2 (x86_64) にて、KVM (Kernel-based Virtual Machine) の xml ファイルフルパスを指定すると、その KVM の xml ファイル自体と仮想imgファイルをバックアップするスクリプトを作成しました。

  • 「指定された仮想マシンの電源を自動的にシャットダウン、仮想マシンの xml ファイルと仮想 HDD ファイルのバックアップ、バックアップ終了後に仮想マシンの電源をオン」という機能をひと通り備えています。

もちろん事前の動作確認や設定は必要ですが、「毎晩、とある重要な仮想マシン1台を、自動的にシャットダウン、バックアップ、電源をオンにする」という利用方法も可能です。

2.前準備

事前に、cpulimit というソフトをインストールしておく必要があります。

(参考) Linux (CentOS 6.2 x86_64) に、「cpulimit」をインストールして、実行する (= 絶対的な優先度を下げる) 手順

http://hachitaro.blogspot.jp/2012/06/linux-centos-62-x8664-cpulimit.html

3.「kvm-bkonevm.sh」スクリプト利用方法

「kvm-bkonevm.sh」スクリプトの利用方法は以下の通りです。

書式

(this scriptfile) (kvm xml file fullpath) (copy destination directory for copying kvm xml file and hd image file)

利用例

./kvm-bkonevm.sh /etc/libvirt/qemu/pc014.xml /mnt/pc079/d/bak/0101_phasedbak

上のとおりに実行すると、以下の処理を実行します。

  1. スクリプトは、「/etc/libvirt/qemu/pc014.xml」で指定されている仮想マシンの電源がオン(ON) の場合は、シャットダウン処理を開始します。

    kvm-bkonevm.sh を実行した後で「仮想マシンの電源がオンになっている」場合は、この kvm-bkonevm.sh スクリプトが仮想マシンに対してシャットダウン命令 (virsh shutdown) を発行します。

    仮想マシンが何らかの理由で自動的にシャットダウンしない場合は、手作業で仮想マシンをシャットダウン操作をする必要があります。

  2. スクリプトは、シャットダウン処理が完全に終了して、仮想マシンの電源がオフ(OFF) になるまで待機します。
  3. スクリプトは、xml ファイルと、仮想 HDD イメージファイルをバックアップ (コピー) します。

    xml ファイル、仮想 HDD イメージファイルいずれとも、できるかぎり元のディレクトリ構成を保ったままバックアップします。

    • xmlファイルのバックアップ先の例

      「/etc/libvirt/qemu/pc014.xml」

    • 仮想 HDD イメージファイルのバックアップ先の例

      「/var/lib/libvirt/images/pc014.img」

  4. スクリプトは、バックアップ終了後に仮想マシンの電源をオンにします。

4.「kvm-bkonevm.sh」スクリプト本体

「スクリプトご利用上の注意」をよくお読みの上、ご了承いただいた方はご利用下さい。

「kvm-bkonevm.sh」スクリプトは以下の通りです。

#!/bin/sh

# usage
# (this scriptfile) (kvm xml file fullpath) (copy destination directory for copying kvm xml file and hd image file)
# example
# ./kvm-bkonevm.sh /etc/libvirt/qemu/pc014.xml /mnt/pc079/d/bak/0101_phasedbak


function funcCPULimit() {
curdttm=`date +%Y%m%d%H%M%S`
msg="cpulimit -e qemu-kvm -l 5 &"
echo "${quotstr}${curdttm}${quotstr} ${quotstr}${msg}${quotstr}" | tee -a ${logdirfilename}
cpulimit -e qemu-kvm -l 10 &

curdttm=`date +%Y%m%d%H%M%S`
msg="cpulimit -e rsync -l 10 &"
echo "${quotstr}${curdttm}${quotstr} ${quotstr}${msg}${quotstr}" | tee -a ${logdirfilename}
cpulimit -e rsync -l 20 &

curdttm=`date +%Y%m%d%H%M%S`
msg="cpulimit -e mysqldump -l 5 &"
echo "${quotstr}${curdttm}${quotstr} ${quotstr}${msg}${quotstr}" | tee -a ${logdirfilename}
cpulimit -e qemu-kvm -l 10 &

return 11
}


# パスの文字列に「//」のように不要な「/ (スラッシュ)」が入っている場合は
# 「//」を「/」へ置き換える。
function FuncReplaceDoubleSlashtoSingle() {
wstr=$1
retstr=`echo "${wstr}" | sed -e 's/\/\//\//g'`
echo ${retstr}
}

function FuncRemoveRightSlash() {
wstr=$1

# wstr の最後の一文字を抜き出す。
wstrlenall=`echo $((${#wstr}))`
lastchar=${wstr:${wstrlenall}:${wstrlenall}}

if [[ ${lastchar} = "/" ]]
then
# 一番右端の一文字が「/」なら
# 「/」を削除する。
retstr=${wstr##*/}
else
# 一番右端の一文字が「/」以外なら
# 削除処理は不要
retstr=${wstr}
fi

echo ${retstr}

}

function FuncAddRightSlash() {
wstr=$1

# wstr の最後の一文字を抜き出す。
wstrlenall=`echo $((${#wstr}))`
lastchar=${wstr:${wstrlenall}:${wstrlenall}}

if [[ ${lastchar} = "/" ]]
then
# 一番右端の一文字が「/」なら
# 「/」を追加する必要はない。
retstr=${wstr}
else
# 一番右端の一文字が「/」以外なら
# 「/」を追加する。
retstr=${wstr}'/'
fi

echo ${retstr}

}

function FuncGetStrQuotedWithDifferentStr() {

# getting kvm sv251.xml information
# wallstr=`virsh domxml-to-native qemu-argv /etc/libvirt/qemu/sv251.xml`

# 第1引数は、
# 「virsh domxml-to-native qemu-argv (kvm の xml ファイルフルパス)」
# の値。
# wallstr=$1
# wallstr=`virsh domxml-to-native qemu-argv /etc/libvirt/qemu/sv251.xml`

# echo '${1}..........'$1
wallstr=$1
# echo '${wallstr}..........'${wallstr}

wallstrlen=`echo ${#wallstr}`

# echo 'wallstrlen is '${wallstrlen}

# searchtarget_leftstr='-drive file='
searchtarget_leftstr=$2
searchtarget_leftstrlen=`echo ${#searchtarget_leftstr}`
# searchtarget_rightstr=','
searchtarget_rightstr=$3


tempstr[0]=`echo "${wallstr##*${searchtarget_leftstr}}"`
# echo '${tempstr[0]} is '${tempstr[0]}
tempstrlen[0]=`echo ${#tempstr[0]}`
# echo '${tempstrlen[0]} is '${tempstrlen[0]}

targetstr_startpos=`expr ${wallstrlen} - ${tempstrlen[0]}`
# echo '${targetstr_startpos} is '${targetstr_startpos}
targetstr_startpos_fixed=`expr ${targetstr_startpos} + 1`

tempstr[1]=`echo "${tempstr[0]#*${searchtarget_rightstr}}"`
# echo '${tempstr[1]} is '${tempstr[1]}
tempstrlen[1]=`echo ${#tempstr[1]}`
# echo '${tempstrlen[1} is '${tempstrlen[1]}

targetstr_endpos=`expr ${wallstrlen} - ${tempstrlen[1]}`
# echo '${targetstr_endpos} is '${targetstr_endpos}
targetstr_endpos_fixed=`expr ${targetstr_endpos} - 1`
# echo '${targetstr_endpos_fixed} is '${targetstr_endpos_fixed}


# retstr=`echo ${wallstr} | cut -c ${targetstr_startpos}-${targetstr_endpos_fixed}`
retstr=`echo ${wallstr} | cut -c ${targetstr_startpos_fixed}-${targetstr_endpos_fixed}`

echo ${retstr}


}


function funcGetKVMInfo() {
# getting KVM xml file copy source, destination,
# and getting KVM hd file copy source, destination

# getting KVM HDD information
# wstr=`virsh domxml-to-native qemu-argv /etc/libvirt/qemu/sv251.xml`


wstr=`virsh domxml-to-native qemu-argv ${kvmxml_fullpath_src}`

# KVM の 仮想マシン名を取得する。
# 左側が「'-name '」で、(一番右端に半角スペースを含める)
leftstr='-name '
# 右側が「' -uuid'」で、(一番左端に半角スペースを含める)
# rightstr=' -uuid'
rightstr=' '
# 囲まれた文字列を、${wstr} から探し出して、
# kvm_hd_fullpath_src に代入する。
# 引数 ${wstr} の内容が半角スペースを含むため、"" でくくる。
targetvmname=`FuncGetStrQuotedWithDifferentStr "${wstr}" "${leftstr}" "${rightstr}"`
# echo '${targetvmname} is "'${targetvmname}'"'

curdttm=`date +%Y%m%d%H%M%S`
msg='${targetvmname} is "'${targetvmname}'"'
echo "${quotstr}${curdttm}${quotstr} ${quotstr}${msg}${quotstr}" | tee -a ${logdirfilename}


# KVM の 仮想 HDD のフルパスを取得する。
# 左側が「'-drive file='」で、
leftstr='-drive file='
# 右側が「','」で、
rightstr=','
# 囲まれた文字列を、${wstr} から探し出して、
# kvm_hd_fullpath_src に代入する。
# 引数 ${wstr} の内容が半角スペースを含むため、"" でくくる。
kvm_hd_fullpath_src=`FuncGetStrQuotedWithDifferentStr "${wstr}" "${leftstr}" "${rightstr}"`
# echo '${kvm_hd_fullpath_src} is '${kvm_hd_fullpath_src}
curdttm=`date +%Y%m%d%H%M%S`
msg='${kvm_hd_fullpath_src} is '${kvm_hd_fullpath_src}
echo "${quotstr}${curdttm}${quotstr} ${quotstr}${msg}${quotstr}" | tee -a ${logdirfilename}

# kvm_hd_dir_src=`echo ${kvm_hd_fullpath_src%/*}`
kvm_hd_dir_src=${kvm_hd_fullpath_src%/*}
# echo '${kvm_hd_dir_src} is '${kvm_hd_dir_src}
curdttm=`date +%Y%m%d%H%M%S`
msg='${kvm_hd_dir_src} is '${kvm_hd_dir_src}
echo "${quotstr}${curdttm}${quotstr} ${quotstr}${msg}${quotstr}" | tee -a ${logdirfilename}

# echo '${kvmxml_fullpath_src} is '${kvmxml_fullpath_src}
curdttm=`date +%Y%m%d%H%M%S`
msg='${kvmxml_fullpath_src} is '${kvmxml_fullpath_src}
echo "${quotstr}${curdttm}${quotstr} ${quotstr}${msg}${quotstr}" | tee -a ${logdirfilename}

kvm_xml_dir_src=${kvmxml_fullpath_src%/*}
# echo '${kvm_xml_dir_src} is '${kvm_xml_dir_src}
curdttm=`date +%Y%m%d%H%M%S`
msg='${kvm_xml_dir_src} is '${kvm_xml_dir_src}
echo "${quotstr}${curdttm}${quotstr} ${quotstr}${msg}${quotstr}" | tee -a ${logdirfilename}

# echo '${copybasedir_dest} is '${copybasedir_dest}
curdttm=`date +%Y%m%d%H%M%S`
msg='${copybasedir_dest} is '${copybasedir_dest}
echo "${quotstr}${curdttm}${quotstr} ${quotstr}${msg}${quotstr}" | tee -a ${logdirfilename}

curdttm=`date +%Y%m%d%H%M%S`
curdt=`date +%Y%m%d`

thispchostname=`hostname -s`

kvmxml_copydir_dest=`FuncAddRightSlash ${copybasedir_dest}`
# kvmxml_copydir_dest=${kvmxml_copydir_dest}`FuncAddRightSlash ${curdt}`
kvmxml_copydir_dest=${kvmxml_copydir_dest}`FuncAddRightSlash ${curdttm}`
kvmxml_copydir_dest=${kvmxml_copydir_dest}`FuncAddRightSlash ${thispchostname}`
kvmxml_copydir_dest=${kvmxml_copydir_dest}`FuncRemoveRightSlash ${kvm_xml_dir_src}`
kvmxml_copydir_dest=`FuncReplaceDoubleSlashtoSingle ${kvmxml_copydir_dest}`
curdttm=`date +%Y%m%d%H%M%S`
msg='${kvmxml_copydir_dest} is '${kvmxml_copydir_dest}
echo "${quotstr}${curdttm}${quotstr} ${quotstr}${msg}${quotstr}" | tee -a ${logdirfilename}
kvmhd_copydir_dest=`FuncAddRightSlash ${copybasedir_dest}`
# kvmhd_copydir_dest=${kvmhd_copydir_dest}`FuncAddRightSlash ${curdt}`
kvmhd_copydir_dest=${kvmhd_copydir_dest}`FuncAddRightSlash ${curdttm}`
kvmhd_copydir_dest=${kvmhd_copydir_dest}`FuncAddRightSlash ${thispchostname}`
kvmhd_copydir_dest=${kvmhd_copydir_dest}`FuncRemoveRightSlash ${kvm_hd_dir_src}`
kvmhd_copydir_dest=`FuncReplaceDoubleSlashtoSingle ${kvmhd_copydir_dest}`
# echo '${kvmhd_copydir_dest} is '${kvmhd_copydir_dest}
curdttm=`date +%Y%m%d%H%M%S`
msg='${kvmhd_copydir_dest} is '${kvmhd_copydir_dest}
echo "${quotstr}${curdttm}${quotstr} ${quotstr}${msg}${quotstr}" | tee -a ${logdirfilename}

}

function funcWaitWithCountDown() {
wWaitSecCount=$1
wBaseMsg=$2
curdttm=`date +%Y%m%d%H%M%S`
msg="${wWaitSecCount} ${wBaseMsg}"
echo "${quotstr}${curdttm}${quotstr} ${quotstr}${msg}${quotstr}" | tee -a ${logdirfilename}
until [ ${wWaitSecCount} -eq 0 ]
do
curdttm=`date +%Y%m%d%H%M%S`
msg="${wWaitSecCount}"
echo "${quotstr}${curdttm}${quotstr} ${quotstr}${msg}${quotstr}" | tee -a ${logdirfilename}
wWaitSecCount=`expr ${wWaitSecCount} - 1`
sleep 1
done

}

function funcKVM_VM_PowerOnProcStart() {
# echo "now start vm "${targetvmname}
curdttm=`date +%Y%m%d%H%M%S`
msg="Now PowerOn the vm "${targetvmname}
echo "${quotstr}${curdttm}${quotstr} ${quotstr}${msg}${quotstr}" | tee -a ${logdirfilename}

curdttm=`date +%Y%m%d%H%M%S`
msg=`virsh start ${targetvmname}`
echo "${quotstr}${curdttm}${quotstr} ${quotstr}${msg}${quotstr}" | tee -a ${logdirfilename}

curdttm=`date +%Y%m%d%H%M%S`
msg="The PowerOn Process has finished. Please wait for OS to start."${targetvmname}
echo "${quotstr}${curdttm}${quotstr} ${quotstr}${msg}${quotstr}" | tee -a ${logdirfilename}

}

function funcKVM_VM_ShutdownStart() {
curdttm=`date +%Y%m%d%H%M%S`
msg="starting to shutdown ${targetvmname}..."
echo "${quotstr}${curdttm}${quotstr} ${quotstr}${msg}${quotstr}" | tee -a ${logdirfilename}
# echo ${targetvmname}"shutdown starting..."
# ssh -t -t root@${targetvmname} shutdown -h now
curdttm=`date +%Y%m%d%H%M%S`
# msg=`ssh -t -t root@${targetvmname} shutdown -h now`
msg=`virsh shutdown ${targetvmname}`
echo "${quotstr}${curdttm}${quotstr} ${quotstr}${msg}${quotstr}" | tee -a ${logdirfilename}

curdttm=`date +%Y%m%d%H%M%S`
msg="shutdown process of ${targetvmname} has started..."
echo "${quotstr}${curdttm}${quotstr} ${quotstr}${msg}${quotstr}" | tee -a ${logdirfilename}
}

function funcKVM_VM_ShutdownFinishWait() {
while [ 1 -eq 1 ]
do
curvmdomstat=`virsh domstate ${targetvmname}`
# echo "curent ${targetvmname} status is ${curvmdomstat}"
curdttm=`date +%Y%m%d%H%M%S`
msg="curent ${targetvmname} status is ${curvmdomstat}. Now waiting for shut off..."
echo "${quotstr}${curdttm}${quotstr} ${quotstr}${msg}${quotstr}" | tee -a ${logdirfilename}
sleep 1
if [ `echo ${curvmdomstat} | grep シャットオフ` ]; then
break
fi
if [ `echo ${curvmdomstat} | grep "shut off"` ]; then
break
fi
done

curdttm=`date +%Y%m%d%H%M%S`
msg="curent ${targetvmname} status is ${curvmdomstat}"
echo "${quotstr}${curdttm}${quotstr} ${quotstr}${msg}${quotstr}" | tee -a ${logdirfilename}
curdttm=`date +%Y%m%d%H%M%S`
msg="Now ${targetvmname} is confirmed to be ${curvmdomstat}"
echo "${quotstr}${curdttm}${quotstr} ${quotstr}${msg}${quotstr}" | tee -a ${logdirfilename}

}


function funcKVM_VM_XML_backup() {
curdttm=`date +%Y%m%d%H%M%S`
msg=`mkdir -p -m +w ${kvmxml_copydir_dest} 2>&1`
echo "${quotstr}${curdttm}${quotstr} ${quotstr}${msg}${quotstr}" | tee -a ${logdirfilename}

curdttm=`date +%Y%m%d%H%M%S`
msg=`rsync -avvv --delete --timeout=3600 --bwlimit=8192 ${kvmxml_fullpath_src} ${kvmxml_copydir_dest} 2>&1`
echo "${quotstr}${curdttm}${quotstr} ${quotstr}${msg}${quotstr}" | tee -a ${logdirfilename}
return 11
}

# rsync option
# --bwlimit=8192 --timeout=3600
# is added to avoid the following error
# rsync: connection unexpectedly closed
#
# reference
# http://kawama.jp/archives/2007/12/rsyncssh.html
function funcKVM_VM_HDImgFile_backup() {
curdttm=`date +%Y%m%d%H%M%S`
msg=`mkdir -p -m +w ${kvmhd_copydir_dest} 2>&1`
echo "${quotstr}${curdttm}${quotstr} ${quotstr}${msg}${quotstr}" | tee -a ${logdirfilename}

curdttm=`date +%Y%m%d%H%M%S`
msg=`rsync -avvv --delete --timeout=3600 --bwlimit=8192 ${kvm_hd_fullpath_src} ${kvmhd_copydir_dest} 2>&1`
echo "${quotstr}${curdttm}${quotstr} ${quotstr}${msg}${quotstr}" | tee -a ${logdirfilename}


return 11
}

function funcDispFinishedMessage() {
curdttm=`date +%Y%m%d%H%M%S`
msg="${targetvmname} backup process has finished. Thank you for your cooperation."
echo "${quotstr}${curdttm}${quotstr} ${quotstr}${msg}${quotstr}" | tee -a ${logdirfilename}
return 11
}

function funcMainProc() {
# funcWaitWithCountDown 30 " now waiting for starting a process of KVM xml and hd file backup... If you want to stop, Ctrl+C"
funcCPULimit
funcGetKVMInfo
funcWaitWithCountDown 30 " now waiting for shutdown ${targetvmname}... If you want to stop, Ctrl+C"
funcKVM_VM_ShutdownStart
funcKVM_VM_ShutdownFinishWait
funcWaitWithCountDown 30 " now waiting for staring file copy of ${targetvmname} files... If you want to stop, Ctrl+C"
funcKVM_VM_XML_backup
funcKVM_VM_HDImgFile_backup
funcKVM_VM_PowerOnProcStart
funcDispFinishedMessage
}

function funcMain() {
funcMainProc
}


curdttm=`date +%Y%m%d%H%M%S`
curdt=`date +%Y%m%d`
# ログファイル名を決定する。
curdttmforlogfilename=${curdttm}
logdir='/var/log/1050/'
mkdir -p -m +w ${logdir} 2>&1
logfilename_suffix='_log_'
shfilename=`basename $0`
logfilename_ext='.txt'
quotstr='"'
logdirfilename=${logdir}${curdttmforlogfilename}${logfilename_suffix}${shfilename}${logfilename_ext}


kvmxml_fullpath_src=$1
copybasedir_dest=$2
# funcMain ${kvmxml_fullpath_src} ${copydir_dest}
funcMain ${kvmxml_fullpath_src} ${copydir_dest}

2012年6月13日水曜日

KVM (Kernel-based Virtual Machine) の仮想PC、仮想マシン (仮想PC の OS は CentOS 6.2 x86_64) をコピーして、新しい仮想PCを作る手順


KVM (Kernel-based Virtual Machine) の仮想PC、仮想マシン (仮想PC の OS は CentOS 6.2 x86_64) をコピーして、新しい仮想PCを作る手順


ここでは、pc100 を pc200 にコピーする場合を例に説明します。


◆手順1.仮想HD ファイルのコピー

仮想HD ファイルをコピーします。
cp コマンドでも、GNOME のファイルブラウザを利用してコピーしても
どちらでも構いません。
必要に応じてリネームします。

コピー元
/var/lib/libvirt/images/pc100.img

コピー先
/var/lib/libvirt/images/

コピー終了後、以下の 2 つのファイルが存在する状態が正しい状態です。
/var/lib/libvirt/images/pc100.img
/var/lib/libvirt/images/pc200.img


◆手順2.xml ファイルのコピー
cp コマンドでも、GNOME のファイルブラウザを利用してコピーしても
どちらでも構いません。
必要に応じてリネームします。


コピー終了後、以下の 2 つのファイルが存在する状態が正しい状態です。
/etc/libvirt/qemu/pc100.xml
/etc/libvirt/qemu/pc200.xml


◆手順3.pc200.xml の編集
vi や gedit などのテキストエディタで「pc200.xml」を編集します。


変更1箇所目...name
変更前
 <name>pc100</name>
変更後
 <name>pc200</name>


変更2箇所目...uuid (コメント化する)
変更前(例)
 <uuid>dc182d1a-44f2-bc49-5b0e-xxxxxxxxxxxx</uuid>

変更後
<!--
 <uuid>dc182d1a-44f2-bc49-5b0e-xxxxxxxxxxxx</uuid>
-->

変更3箇所目...仮想HD イメージファイルのフルパスの修正
変更前
     <source file='/var/lib/libvirt/images/pc100.img'/>
変更前
     <source file='/var/lib/libvirt/images/pc200.img'/>


変更3箇所目...MACアドレスの修正
変更前
     <mac address='52:54:xx:xx:xx:a5'/>
変更後 (例)
     <mac address='52:54:xx:xx:xx:a6'/>

他のPCのMACアドレスと重複しないMACアドレスを指定します。
具体的には、一番右側の2桁の16進数を修正します。
上の説明の例ではa5に+1して、a6に変更しています。


上の修正が終了したら、ファイルを保存します。

◆手順4.「virsh define」
コンソールを起動します。

以下のように入力します。
virsh define /etc/libvirt/qemu/pc200.xml


◆手順5.仮想マシンマネージャーを一旦終了して、再度起動する

仮想マシンマネージャーを起動します。
もし仮想マシンマネージャーを実行中の場合はいったん終了してから、もう一度起動します。


仮想マシンの一覧に、pc200 が存在することを確認します。


◆手順6.仮想マシン(pc200) の起動
仮想マシンを起動します。

◆手順7.仮想マシン(pc200) のホスト名 (Linuxの場合。Windows の場合はコンピュータ名に相当)、IPアドレスの変更

ホスト名と、IP アドレスを変更します。


# vi /etc/sysconfig/network

変更前
HOSTNAME=pc100

変更後
HOSTNAME=pc100


# vi /etc/sysconfig/network-scripts/ifcfg-eth0

変更前
IPADDR=192.168.1.100

変更後
IPADDR=192.168.1.200


◆手順8.同仮想PCの再起動
ホスト名の変更を有効にするために、PC200を再起動します。

# shutdown -r now

◆手順9.再起動後の動作確認
再起動後、必要に応じて動作確認を行います。

ファイルサーバー(CIFS、NFS) を利用している場合は、そのファイルサーバーをマウントできていること
Webブラウザで、www.google.co.jp や www.yahoo.co.jp へ接続して、ページが表示されること